Using Markdown with Postach.io
Hello World!!!
This HTML is highlighted with Prism using code marks for the highlighting like language-html
<!DOCTYPE html>
<html>
<head>
   ...
   <link href="themes/prism.css" rel="stylesheet" />
</head>
<body>
   ...
   <script src="prism.js"></script>
</body>
</html>
Why Bother?
I do love my work on code highlighting in Evernote. But this markdown stuff may be cooler? Hard to decide. With Markdown, it's definitely more flexible to pop out to a text editor and then back in.
[Testing edit from iPad... just added this]
Are there extra lines or not?
let stringSet = Set(["car", "boat", "bike", "toy"])
let stringArray = stringSet.sorted()

print(stringArray)
// will print ["bike", "boat", "car", "toy"]
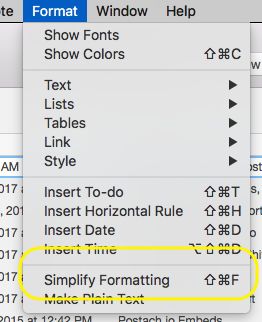
Okay, the extra lines are only there if you switch the format using Make Plain Text. Do NOT use Make Plain Text, and always use Simplify Formatting


What About Embeds?
Will Postachio deal with the embeds, still?
[So this embed got removed because I edited this note on iPad... so that's an issue. Maybe a big issue?]
OMG that's absolutely awesome. Which means you could also do iframes and probably even random html.

Posted on August 21st, 2017
Lazy Array in Swift

Posted on August 19th, 2017
Method Selection in Swift

Posted on August 19th, 2017
Code Blocks in Postachio

Posted on August 17th, 2017
Swift 2 to 3, Method Calls, Magic First Parameters & Automatic Conversion Woes
Swift 2 Calling Swift 2
Consider these two methods in Swift 2:
func doThis(thing: AnyObject) {}

func doThisThing(thing thing: AnyObject) {}
are called like this in Swift 2.
doThis("")

doThisThing(thing: "")
So:
- The first parameter in the doThis method cannot be named by the caller.
- Whether the method name ends in the first parameter name or not, the behavior doesn't change.
Swift 2 Calling Objective-C
Here are two methods in Objective-C:
- (void) doIt:(NSObject *)thing;

- (void) doThisThing:(NSObject *)thing;
Both of these methods get called without their first parameter name from Swift 2:
someObjcObject.doIt("")

someObjcObject.doThisThing("")
So:
- First parameter name is not used.
- The method name is the same as the method name in Objective-C.
- This is true even if the method end in an obvious parameter name, like "doThisWithThing"
Objective-C Calling Swift 2
The method name is the same as that seen in Swift unless you've doubled up on the parameter name as in the above example. So:
func doThis(thing: AnyObject) {}

func doThisThing(thing thing: AnyObject) {}
results in this calling code in Objective-C (note the altered method name in the second example):
[vc doThis:@""];

[vc doThisThingWithThing:@""];
The first method doesn't change even if we use an underscore in the Swift method declaration:
func doThis(_ thing: AnyObject) {}
So:
- The method names translate normally
- Doubled-up parameter names get added to the method name in Objective-C with the conjunction "with"
Changes in Swift 3
There is no automatic removal of the first parameter name, so:
func doThisThing(thing: AnyObject) {}
gets called like this:
doThisThing(thing: "" as AnyObject)
If you want to remove the first parameter label for callers, you can use an underscore, of course.
Weird Automatic Conversion to Swift 3
So this converted just fine:
func doThis(thing: AnyObject) {}

func doThisThing(thing thing: AnyObject) {}

// calling code
doThisThing(thing: "what")
doThis("what")
and became this in Swift 3
func doThisThing(thing: AnyObject) {}

func doThis(_ thing: AnyObject) {}

// calling code
doThisThing(thing: "what" as AnyObject)
doThis("what" as AnyObject)
So that makes sense.
Converting Again
Now you realize that your massive conversion needs to forward merge more Swift 2 code into the same target. Xcode warns you not to do automatic conversion again, but you do it anyway.
The two methods now look like this, which makes no sense (the second one has now lost its parameter label):
func doThisThing(_ thing: AnyObject) {
    print("doThisThing \(thing.hash)")
}

func doThis(_ thing: AnyObject) {
    print("doThis \(thing.hash)")
}

// calling code
doThisThing("what" as AnyObject)
doThis("what" as AnyObject)
In this simple case the callers get updated, but the Objective-C callers do not:

And in many cases, your calling code will be broken in Swift as well.
Calling Objective-C from Swift 2 vs. 3
The automatic madness deepens with Swift 3 interop.
Consider this signature in Objective-C:
+ (NSObject *)deserializeNewOrExistingObjectFromAPIV1JSON:(NSDictionary *)json
In Swift 2 you called it this way:
ThatObject.deserializeNewOrExistingObjectFromAPIV1JSON(json.dictionaryObject)
But this changes in Swift 3 to:
ThatObject.deserializeNewOrExistingObject(fromAPIV1JSON: json.dictionaryObject)
And now the result comes back as a forced optional, whereas in Swift 2 it came back as a non-optional.
Which may or may not get picked up by the automatic converter. The more complex your compilation target is, the less likely the automatic conversion is to succeed.
Some capitalization changes as Objective-C gets magically converted:
- (instancetype)initWithJSON:(NSDictionary *)messageBody
// Swift 2
ThatObject(JSON: dict)!

// Swift 3
ThatObject(json: dict)
And some stuff gets even weirder in Objective-C interop:
+ (id)findForUuid:(NSString *)uuid
// Swift 2
ThatObject.findForUuid(uuid)

// Swift 3
ThatObject.find(forUuid: tender.uuid)!

Posted on August 16th, 2017
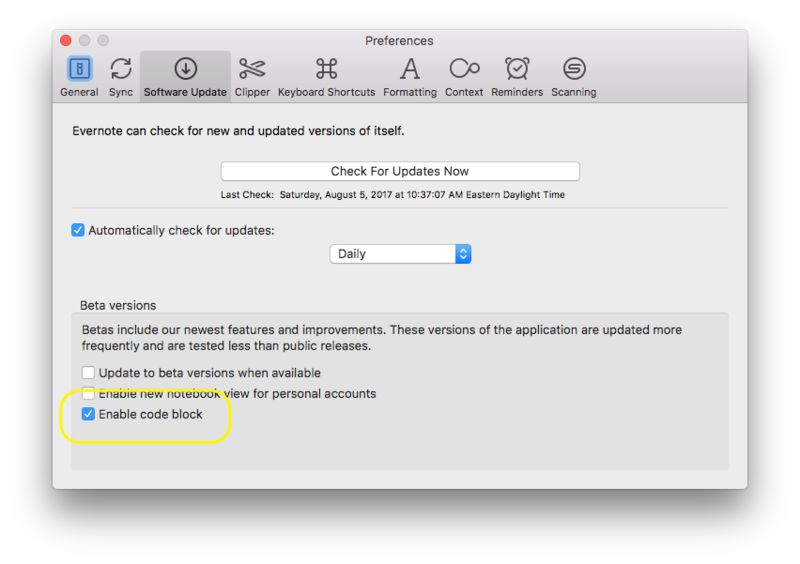
Code Highlighting in Evernote... Kinda

- Type one line of text
- Turn that into a code block
- Replace the contents of that code block with code you paste from Xcode
- That's it!

Posted on August 5th, 2017
Associated Object Support for Swift 2.3
import UIKit

final class Lifted {
    let value: Any
    init(_ x: Any) {
        value = x
    }
}

extension NSObject {
    func setAssociatedObject(value: T, associativeKey: UnsafePointer<Void>, policy: objc_AssociationPolicy = .OBJC_ASSOCIATION_RETAIN_NONATOMIC) {
        if let v: AnyObject = value as? AnyObject {
            objc_setAssociatedObject(self, associativeKey, v,  policy)
        }
        else {
            let liftedObject = Lifted(value)
            objc_setAssociatedObject(self, associativeKey, liftedObject,  policy)
        }
    }

    func getAssociatedObject(associativeKey: UnsafePointer<Void>) -> T? {
        let value = objc_getAssociatedObject(self, associativeKey)
        if let value = value as? Lifted {
            return value.value as? T
        }
        return value as? T
    }
}
extension UIView {
    private struct AssociatedKeys {
        static var viewExtension = "viewExtension"
        static var anotherView = "someOtherView"
        static var someFloat = "someFloat"
    }

    var someFloat: Float {
        get {
            return getAssociatedObject(&AssociatedKeys.someFloat) ?? 0.0
        }
        set {
            setAssociatedObject(newValue, associativeKey: &AssociatedKeys.someFloat)
        }
    }

    var baseTransform: CGAffineTransform? {
        get {
            return getAssociatedObject(&AssociatedKeys.viewExtension)
        }
        set {
            setAssociatedObject(newValue, associativeKey: &AssociatedKeys.viewExtension)
        }
    }

    var anotherView: UIView? {
        get {
            return getAssociatedObject(&AssociatedKeys.anotherView)
        }

        set {
            setAssociatedObject(newValue, associativeKey: &AssociatedKeys.anotherView)
        }
    }
}


Using the Example
var view = UIView()
view.baseTransform = CGAffineTransformIdentity
print("what's up \(view.baseTransform)")
view.baseTransform = nil
print("what's up \(view.baseTransform == nil)")
view.anotherView = UIView()
print("you got another view? \(view.anotherView)   \(view.anotherView?.anotherView)")
view.anotherView = nil
view.someFloat = 32.5
print("what's it? \(view.someFloat)")

Posted on December 6th, 2016
Associated Object Support for Swift 3.x

Posted on November 10th, 2016
Subprojects in Xcode with Static Libs
- You can add projects to projects (subprojects) or to workspaces
- Projects can be saved as workspaces
- Add a project to another project -- or a workspaces -- by adding the .xcodeproj file.
- Create a new, Single View Application for iOS
- Add the .xcodeproj for an Xcode project that produces a .a file
In this example we're using GBDevice.
- Set up the primary project like this

- Create a new header file called BridgingHeader.h
- Add it to the Build Settings for the Single Window App

- Utilize it in a Swift file
let version = GBDeviceInfo.init().modelString
print(version) - That's it.

Posted on January 30th, 2016
Hangouts, Spaces on OSX


Posted on November 1st, 2015

